Permits, Equipment, Pricing, and Launch Planning Basics
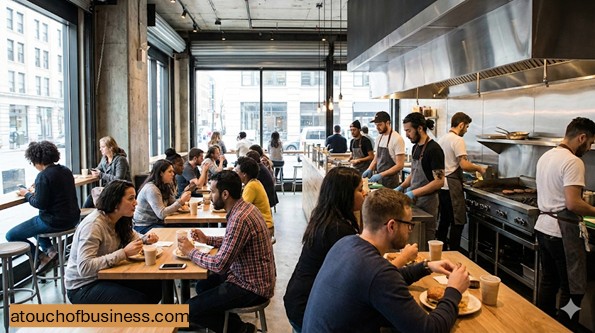
Burger Restaurant Overview
You know that moment when you look at a simple burger place and think, “I could run this.” Then you picture the lines, the equipment, the inspections, and the lease, and the confidence fades fast.
This guide is here to keep you steady. You will focus on startup and pre-launch steps, so you can open legally, safely, and with a plan you can follow.
What This Business Looks Like in Real Life
A burger restaurant sells made-to-order burgers and related food items. Most sales come from individual orders placed at a counter, a window, online ordering, or a drive-thru lane.
This is usually a location-based business. Convenience matters, because customers often choose what is closest and fastest.
Food and Service Offerings
Keep your first food list simple. You can expand later, but startup is easier when you can train fast, prep fast, and buy ingredients in clean, repeatable quantities.
Common offerings include burgers, fries, other sides, soft drinks, and shakes. Many places also offer takeout, online ordering, and delivery through third parties.
Who Your Customers Usually Are
This business often serves people who want a fast meal and a familiar product. Many customers come during lunch, after school, after work, and on weekends.
If you are in a business district, lunch traffic is often the key driver. If you are near entertainment or campuses, evenings can be just as important.
Pros and Cons You Should Know Before You Start
Every business has tradeoffs. The goal is to know what you are signing up for before you sign a lease.
Here are practical pros and cons to weigh before you commit.
- Pros: A tight food list can be built around repeat ingredients, which can simplify ordering and prep.
- Pros: A clear product can be tested quickly with a small launch before you expand.
- Cons: Perishable ingredients require dependable refrigeration and strict food safety habits.
- Cons: Grease-producing cooking often triggers ventilation, fire safety, and wastewater requirements you must verify locally.
- Cons: A strong location can be expensive, and lease terms can limit what you can install or change.
How This Business Can Be Sized
You can start small, but you cannot ignore fixed costs. A compact counter-service spot or a delivery-only kitchen can reduce customer-area build-out.
A drive-thru or large dine-in space usually requires more build-out work, more equipment, and more staff coverage, which can push you toward partners, investors, or larger financing.
How a Burger Place Earns Revenue
Revenue usually comes from individual orders. The business must price items so it can cover food costs, labor costs, occupancy costs, and still leave room to pay the owner.
Your job during startup is to confirm there is demand and enough profit to cover bills and pay you, not just to create a popular product.
Core Skills You Will Need (Or Must Get Help With)
You do not need to be great at everything. But you do need to cover every key function, either by learning it or paying a qualified person to handle it.
These are common skill areas to plan for during startup.
- Basic food safety and sanitation practices based on local health rules
- Simple financial tracking and cash control
- Pricing and portion control for consistent product cost
- Vendor sourcing and ordering routines
- Staff hiring and training, if you will not run solo
- Layout and equipment planning that supports inspection approval
Day-to-Day Work (High-Level)
This is not a full operations playbook. It is a reality check so you understand what you are building toward.
Day-to-day work often includes receiving deliveries, cold storage checks, prep, cooking, order assembly, cleaning, and sanitation checks.
A Day in the Life of an Owner (Pre-Launch and Early Opening)
Expect your time to split between build-out, approvals, staffing, vendor setup, and cash planning. Early on, many owners also do hands-on work because they are still building the team.
You will likely spend part of the day coordinating inspections, equipment deliveries, and last-minute fixes, plus time on ordering, training, and payment setup.
Essential Equipment List (No Prices)
Equipment choices depend on your cooking style, space, and volume goals. Local health and building reviewers may also influence what you must install.
Use this list to build your own item-by-item shopping list for pricing research.
- Cooking Line: flat-top griddle, charbroiler (if used), deep fryer, warming/holding cabinet, bun toaster, microwave (if used), food thermometers
- Ventilation and Fire Safety (Verify Locally): commercial hood, make-up air equipment (if required), hood fire suppression system, required fire extinguishers
- Cold Storage: reach-in refrigerator, reach-in freezer, undercounter refrigerator for the line, refrigerated prep table for toppings, thermometers for cold units, walk-in refrigerator/freezer (if needed for volume)
- Prep and Storage: stainless prep tables, cutting boards, portion scales, food-grade containers, shelving for dry storage, labeling tools for date marking (per local rules)
- Dishwashing and Sanitation (Verify Locally): multi-compartment sink, handwashing sinks, commercial dishwasher (if used), sanitizer test strips, mop/service sink, cleaning and sanitizing supplies approved for food-contact surfaces
- Front Counter and Ordering: point of sale system, receipt printer, cash drawer (if used), kitchen ticket system, order display board (digital or printed), beverage dispenser (if used), ice machine (if used)
- Packaging and Takeout: burger wraps or boxes, fry containers, carryout bags, portion cups and lids for sauces, tamper-evident seals (if using third-party delivery)
- Facility Support (Verify Locally): grease interceptor or grease trap (if required), hot water heater sized for commercial demand, backflow prevention devices (if required)
Startup Items You Must Price Out
This is where many first-time owners get surprised. You do not just buy cooking equipment. You also pay for build-out, approvals, and the basics that make the place usable.
Build a detailed list first. Then research estimated pricing per item. Size and scale drive startup costs, so keep your first plan realistic.
- Build-Out and Space: lease deposits, build-out materials, plumbing work, electrical work, ventilation work, flooring, wall finishes, restroom upgrades (if needed)
- Equipment and Installation: cooking equipment, refrigeration, hood system, suppression system, set-in-place labor, utility hookups
- Permits and Approvals: plan review fees (if required), building permits, health department approvals, inspections
- Opening Inventory: food ingredients, packaging, cleaning supplies, smallwares (utensils, pans, trays, storage bins)
- Technology: point of sale system, payment processing setup, internet service, online ordering tools (if used)
- Front Area Basics: counter setup, seating and tables (if dine-in), trash and recycling bins, signage (permits may apply)
- Admin and Office Basics: printer (if used), basic office supplies, lockable storage for important records
Varies by Jurisdiction
Rules differ by state, city, and county. Do not guess. Verify requirements before you sign a lease, order equipment, or start construction.
Use this checklist to confirm what applies where you plan to operate.
- Entity and name filings: Check your state’s Secretary of State business portal for registration and name rules.
- Sales tax registration: Check your state Department of Revenue site for prepared food tax rules and registration steps.
- Local business licensing: Search your city or county site for “business license” and “business tax registration.”
- Zoning and use approval: Ask your local planning or zoning office if a restaurant use is allowed at your address.
- Health approvals: Contact your county or city health department for food establishment permit steps and plan review requirements.
- Building and fire approvals: Contact the building department and fire prevention office for permit, inspection, and hood system approval steps.
Step 1: Decide If This Is the Right Fit for You
Start with two decisions. Is owning a business right for you, and is a burger shop the right business for you?
Passion matters because it helps you push through problems. Without it, people often look for an exit instead of solutions. Read why passion matters before you start and use it as a self-check.
Step 2: Do a Motivation Check Before You Spend Anything
Ask yourself this question and answer it in writing: “Are you moving toward something or running away from something?”
If you are starting only to escape a job or fix a short-term cash problem, motivation often fades when the work gets real. Use these startup readiness points to pressure-test your reasons.
Step 3: Run a Risk and Responsibility Check With Your Household
Be honest about what startup can demand: uncertain income, long hours, difficult tasks, fewer vacations, full responsibility, and the need for family support.
Also ask if you have the skills, or can learn the skills, and whether you can secure funds to start and operate while sales ramp up.
Step 4: Talk to Experienced Owners
Only talk to owners you will not be competing against. Look outside your city or region so you can ask real questions without creating friction.
Ask questions like: What surprised you most during permits and inspections? What would you do differently before signing your lease? Which equipment choices helped you most, and which ones were the wrong fit?
For more structure, use this inside look framework to guide your conversations.
Step 5: Confirm Demand and Confirm Profit Potential
Demand is not the same as interest. You want to confirm that enough people will regularly pay for what you plan to offer.
Then confirm there is enough profit margin to cover rent, labor, food, utilities, and still pay you. Use this demand checkup to guide your research.
Step 6: Choose a Business Model and Your Role
Decide whether you will run solo, bring in partners, or seek investors. Also decide whether you will work full time or part time, because that changes staffing and cash needs.
Common models include counter service, drive-thru, delivery-only, and mobile vending supported by a commissary kitchen. Pick the model that fits your budget, skills, and time.
Step 7: Choose a Location Strategy That Matches How Customers Buy
If you will be customer-facing, location matters. Convenience, parking, nearby activity, and visibility can shape your early sales.
Before you commit, study how to choose a location and confirm zoning allows your use at the address.
Step 8: Build a Startup Cost Outline Based on Your Size
Start with your equipment and build-out needs, then add permits, deposits, opening inventory, and working cash for the early months.
Do not guess. Use this startup cost checklist to build a complete list, then price it item by item.
Step 9: Pick a Legal Structure and Register the Business
Many U.S. small businesses start as sole proprietorships because there is no state formation filing for that structure. Many later form a limited liability company (LLC) for liability and clearer structure, and because it can help with banking and partners.
To do this correctly, start with this registration guide, then confirm your state’s rules through the Secretary of State business portal.
Step 10: Get Your Federal Tax Identifier and Set Up Tax Accounts
If you need an Employer Identification Number (EIN), apply through the Internal Revenue Service (IRS). Use the IRS EIN page to follow the official process.
Next, confirm state sales tax and employer account steps through your state tax agency site. If you are unsure, ask a local accountant to confirm what applies for prepared food sales in your state.
Step 11: Confirm Health, Building, Fire, and Accessibility Requirements
Your local health department sets the food establishment approval process, and many jurisdictions base their rules on the Food and Drug Administration (FDA) Food Code. Use the FDA Food Code page as a reference point, then follow your local health department’s requirements.
If you are building out a public space, you also need to plan for accessibility under the Americans with Disabilities Act (ADA). Review ADA Title III guidance before design and construction decisions are locked in.
Step 12: Design the Layout and Lock the Equipment Plan Before You Build
Layout decisions affect permits, inspections, and how fast you can serve customers. Plan the cooking line, cold storage, prep space, dishwashing, handwashing, and storage so it matches code and workflow.
For items that generate grease-laden vapors, confirm ventilation and fire suppression requirements early, because they can drive major construction decisions.
Step 13: Plan Staffing and Hiring Timing
Decide what you will do yourself and what you must hire for. Some owners do most tasks early, then hire as sales grow. Others must hire immediately because the concept needs coverage from day one.
If you want guidance on timing and roles, review how and when to hire and build a simple first-90-days staffing plan.
Step 14: Choose Suppliers and Set Up Accounts
You will likely need suppliers for ground beef, buns, produce, dairy, beverages, and packaging. Compare quality, delivery schedules, minimum orders, and credit terms.
Professional relationships matter here. Clear ordering, clear receiving rules, and clear payment terms reduce early chaos.
Step 15: Set Pricing and Build Your Food List
Set pricing based on your ingredient cost, labor needs, occupancy cost, and target profit. This is where many first-time owners struggle, so take your time and verify the math.
Use this pricing guide to work through a simple, repeatable method.
Step 16: Set Up Banking, Payment Processing, and Basic Financial Tracking
Choose a financial institution and open the accounts you need for business use. Keep transactions separate so you can track results and file taxes cleanly.
Set up how you will accept payment in person and online. If you are not comfortable setting up financial tracking, hire a bookkeeper or accountant to set it up correctly.
Step 17: Plan Insurance and Risk Coverage
At a minimum, plan for general liability coverage. You will also likely need property or equipment coverage, depending on what you own and what your lease requires.
Start with this business insurance overview, then confirm requirements with your agent and your landlord.
Step 18: Choose a Business Name and Lock Your Online Presence
Pick a name you can defend legally and use consistently. Confirm name availability through your state business registry, and confirm local assumed name rules if you will use a trade name.
Use these naming tips, then secure a matching domain and social handles if available.
Step 19: Build Basic Brand Assets Customers Will See
You do not need a complex brand package to open, but you do need consistency. Plan a logo, basic design style, signage plan, and a simple website or landing page.
If you want a structured checklist for professional-looking basics, review how to build an advisor team so you can hire the right help for design, accounting, and legal review.
Step 20: Build a Business Plan You Can Actually Use
Write a business plan even if you are not seeking funding right now. It keeps you on track and forces you to make decisions before you spend.
Use this business plan guide and keep it practical: concept, pricing, location plan, startup budget, and a simple launch plan.
Step 21: Prepare Your Pre-Launch Customer Plan
Decide how people will discover you and how they will place orders. For a location-based business, your goal is to get local awareness before the doors open.
To focus on local foot traffic, review ways to bring customers in and plan a simple opening campaign.
Step 22: Plan Your Opening Push
An opening event can create a fast burst of awareness if you plan it and follow local rules for signs and promotions. Keep it simple and legal.
Use these grand opening ideas to build a short plan you can execute.
Step 23: Final Pre-Opening Checklist
Confirm all approvals are complete, including health, building, and fire requirements that apply at your location. If a Certificate of Occupancy is required for your space and use, confirm it has been issued before you open to the public.
Confirm all equipment is installed, powered, and working, including refrigeration temperatures and hot water supply.
For food safety, confirm you have working thermometers and follow safe cooking temperatures for ground meats. FoodSafety.gov lists 160°F (71°C) for ground meat and sausage, and you can review it here: safe minimum internal temperatures.
Confirm suppliers are set up, opening inventory is on hand, and packaging supplies are ready. Confirm payment processing works in test transactions and receipts print or send correctly.
Confirm your public-facing basics are ready: signs (if permitted), hours posted, online listings updated, and your website live. If you plan a soft opening, keep hours limited and focus on stability and compliance.
Recap and Fit Check
Starting a Burger Shop is not just about a great product. It is about confirming demand, building a realistic startup budget, verifying local requirements, and setting up equipment and approvals so you can open without scrambling.
If you want more readiness checks, review Points to Consider Before Starting Your Business and connect it to your plan.
Is this the right fit for you? It often suits people who like fast-paced work, can handle full responsibility, and can stay calm when problems show up.
Do a simple self-check: Do you have real passion for the work, or are you hoping the business will rescue you from your current situation? Are you ready to learn what you do not know, or pay qualified people to handle what you cannot?
If you want a structured way to learn what owners wish they knew earlier, revisit Business Inside Look and keep your conversations focused on owners outside your market.
101 Must-Know Tips for Your Burger Shop
These tips are meant to give you options, not a strict script.
Focus on what fits your current priorities, and save the rest for later.
Consider bookmarking this page so you can come back when the next challenge shows up.
For best results, try one tip at a time and note what changes.
What to Do Before Starting
1. Pick your service style first (counter service, drive-thru, delivery-only, food truck) because it shapes staffing, space needs, and approvals.
2. Start with a tight food offering so you can train faster, buy smarter, and keep early execution consistent.
3. Define one “signature” burger build and test it with small groups so you can refine taste, portion size, and price before committing.
4. Study nearby competitors within a short drive and record what they charge, how fast they serve, and what customers praise or complain about.
5. Estimate how many orders you need per day to cover rent, labor, food, and utilities, then decide if that target looks realistic for your area.
6. Decide if you will work full time or part time, because part time usually forces earlier hiring and stronger shift controls.
7. Choose whether you will run solo at first or hire from day one, and match that decision to your hours and service style.
8. Pick a location type (strip center, freestanding building, food hall, delivery kitchen) and confirm it fits your budget and build-out needs.
9. Before negotiating a lease, confirm the space can support ventilation, grease management, and the electrical load your equipment will need.
10. Build a simple timeline that includes permits, build-out, equipment installation, inspections, and a test opening so you are not guessing on dates.
11. Speak with owners in other cities or regions and ask what delayed their opening, what they would change about their build-out, and what they wish they priced earlier.
12. Set up a document system from day one for permits, inspection reports, equipment manuals, and vendor contacts so you can find what you need fast.
Legal and Compliance
13. Identify which offices regulate your location (health department, zoning, building, fire prevention, and local licensing) before you spend on construction.
14. Choose a legal structure and follow your state’s formation rules if formation is required for that structure.
15. Apply for an Employer Identification Number if you need it for banking, payroll, or tax filings, and use official Internal Revenue Service guidance to avoid paid third parties.
16. Register for sales tax accounts if your state taxes prepared food, and confirm filing frequency before opening.
17. If you will have employees, set up state employer accounts for withholding and unemployment insurance before the first payday.
18. If you operate under a name that differs from your legal name, confirm whether an assumed name filing is required in your state or county.
19. Ask zoning staff if restaurant use is allowed at your address and whether drive-thru lanes, patio seating, late hours, or outdoor seating trigger extra review.
20. Ask the building department what work requires permits, especially hood installation, plumbing changes, electrical upgrades, and changes to restrooms.
21. Ask the fire prevention office what inspections and sign-offs apply to cooking ventilation and fire suppression systems.
22. Confirm public accessibility requirements early, especially if you are remodeling entrances, seating areas, or restrooms.
23. If your city or county requires a general business license, apply early because some locations require it before you can open to the public.
Facility and Equipment Setup
24. Choose your primary cook method (griddle, charbroiler, fryer) before ordering equipment because it drives ventilation and fire safety requirements.
25. Create a floor plan that shows cooking, prep, dishwashing, handwashing sinks, storage, and customer flow to support plan review and inspections.
26. Reserve real space for dry storage and cold storage because cramped storage increases spoilage and food safety risk.
27. Size refrigeration for peak weeks, not average weeks, because deliveries stack up fast when business is strong.
28. Order long-lead equipment early, especially hood systems and walk-in units, because delays can block your inspection schedule.
29. Confirm electrical panel capacity and gas service match your equipment needs before installation day so you do not pay for last-minute changes.
30. Place a packaging station near the pass so takeout and delivery orders do not slow down the cook line.
31. If you use online ordering, set up a dedicated printer or screen where tickets stay visible and protected from heat and splashes.
32. Create a separate cleaning supply storage area away from food and single-use items, because inspectors often look for proper separation.
33. Confirm grease management needs with the sewer authority, since requirements can include a grease interceptor or grease trap.
34. Keep handwashing sinks accessible at the line and prep areas, and make “no blocking” a clear rule from day one.
35. Do a full equipment walk-through before inspections: hot water, cold temperatures, thermometers, sanitizer testing supplies, and ventilation operation.
Food Safety and Product Consistency
36. Use a food thermometer for burgers, and train staff to target 160°F for ground beef based on federal food safety guidance.
37. Write a standard cook procedure for each patty thickness and cook surface so every cook hits the same result.
38. Keep raw ground meat separate from ready-to-eat items in storage and prep to reduce cross-contamination risk.
39. Use clear station rules (or color-coded tools) so raw-meat prep does not share boards or utensils with produce prep.
40. If you hold cooked items for later service, train staff on safe cooling and reheating steps that match your local health code.
41. Create a simple allergen-handling process for common ingredients like wheat and dairy, and keep it consistent across shifts.
42. Set clear date marking rules for prepared items and opened packages, and follow the time limits in your local health rules.
43. Use test strips for the sanitizer you use and verify concentration at the start of each shift.
44. Keep a written cleaning schedule for high-touch areas like door handles, point of sale screens, and condiment stations.
45. Track refrigerator and freezer temperatures daily and document what you did when temperatures were out of range.
46. Build a supplier recall response file with contacts and steps so you can act fast if a recall affects your ingredients.
47. If you use fresh produce, set clear washing and storage steps so quality stays high and waste stays low.
Running the Business (Operations, Staffing, SOPs)
48. Write an opening checklist that covers food temperatures, sanitizer setup, handwashing supplies, and equipment warm-up.
49. Write a closing checklist that covers cooling, labeling, cleaning, trash removal, and security checks.
50. Define station roles for rush periods so work is shared and orders do not bottleneck at one point.
51. Use portion tools (scales, scoops, ladles) so every burger and side has the same build and the same cost.
52. Set par levels for key items like patties, buns, fries, and packaging, and reorder based on par instead of guessing.
53. Create a simple first-week training plan that covers safety, station flow, and order accuracy.
54. If you handle cash, set a drawer-count routine per shift and require sign-off for overages and shortages.
55. Limit who can issue refunds or free replacements, and write a clear rule so staff do not improvise under pressure.
56. Schedule labor around your real rush windows and adjust using sales-by-hour results from the first month.
57. Keep a maintenance log for refrigeration, hood filters, and fryers so small issues do not become expensive failures.
58. Use a delivery receiving routine: verify quantities, temperatures, and damaged goods before you sign for the delivery.
59. Do a short daily inventory spot-check on your highest-cost items to catch loss early.
Marketing (Local, Digital, Offers, Community)
60. Claim and complete your Google Business Profile before opening so customers can find hours, photos, and basic details.
61. Post hours and ordering options clearly at the entrance and online so customers do not arrive when you are closed.
62. Use a soft opening with limited hours to test ordering flow and food timing before you push major promotions.
63. Build an opening-week offer that is easy to understand and easy to redeem, such as a set-price combo.
64. Ask nearby businesses about cross-promotions, like lunch deals for office staff or a receipt-based discount swap.
65. Use clear exterior signage if allowed, and confirm local sign permit rules before installation.
66. Take consistent photos of your best items, because strong photos reduce uncertainty for first-time customers.
67. If you use delivery apps, compare fees and refund policies before you sign, because fees can force pricing changes.
68. Keep loyalty simple at first, and train staff to mention it once during checkout so it does not slow the line.
69. Collect contact details only if you have a clear plan for using them, such as sending opening-week updates, and follow privacy requirements.
70. Monitor reviews early and respond with calm, factual language, especially when a complaint involves food safety or order accuracy.
71. Track which offers produce repeat visits and stop the ones that only bring one-time traffic.
Dealing with Customers (Trust, Education, Retention)
72. Train staff to repeat back custom orders so you reduce remakes and keep the line moving.
73. Post clear guidance on customization and allergens where customers order so expectations are set before the ticket prints.
74. For special cook requests, use a consistent script about wait time so customers do not feel surprised later.
75. Offer a clear way to report issues, such as a receipt-based contact option, so problems do not only show up on review sites.
76. Use a quick takeout check routine: main item, side, sauces, napkins, and utensils when requested.
77. If you run a drive-thru, keep the window script consistent and short to reduce confusion and errors.
78. Learn the habits of repeat customers and recognize them in a simple way, such as remembering their usual order.
Customer Service (Policies, Feedback)
79. Write a refund and replacement policy in plain language and train staff on exactly when it applies.
80. Set a time limit for handling food quality complaints, such as same day with a receipt, to reduce disputes.
81. Keep a log of common complaints and tie each one to a specific fix, like packaging changes or station retraining.
82. Use a short feedback card during the first month that asks about speed, accuracy, and taste.
83. If you offer catering trays, use written order confirmations with quantities, pickup time, and a contact number.
84. For online orders, decide in advance how you handle missing items and delivery delays, and keep staff aligned on the message.
85. Train staff to listen first, restate the issue, and then offer the next step based on policy, not emotion.
Sustainability (Waste, Sourcing, Long-Term)
86. Track food waste by category for one week each month and target the biggest waste item with one change.
87. Adjust patty and bun ordering to match real sales patterns, because over-ordering ties up cash and increases spoilage.
88. Choose packaging with local disposal rules in mind, since “compostable” products are not helpful if your area cannot process them.
89. Set an oil disposal plan that follows local rules and uses a licensed hauler when required.
90. Keep a backup supplier option for critical items so shortages do not stop service.
Staying Informed (Trends, Sources, Cadence)
91. Subscribe to your local health department updates so you hear about rule changes and local alerts.
92. Review Food and Drug Administration and U.S. Department of Agriculture food safety updates a few times per year for changes that affect handling and cooking.
93. Check food recall notices for items you use often, and document what you did if a recall affects your inventory.
94. Review state and city wage rules annually because local labor rules can change and impact staffing plans.
95. Keep a folder of permit logins and code contacts so you can respond quickly when a landlord or inspector requests documents.
Adapting to Change (Seasonality, Shocks, Competition, Tech)
96. Set pricing review dates, such as monthly, so you can respond to ingredient changes without reacting every week.
97. Create a backup ordering plan for key items that lists acceptable alternate brands and specs.
98. Test one new offer each quarter in a controlled way, and keep only what drives repeat visits.
What Not to Do
99. Do not sign a lease until zoning, health, and build-out feasibility are confirmed through the right offices.
100. Do not buy major equipment before you have a layout and utility plan, because wrong-fit equipment can be hard to return and costly to install.
101. Do not rely on memory for food safety steps; write them down and train to the written standard.
FAQs
Question: What permits do I need to open a burger restaurant in my city?
Answer: Most locations require local business licensing plus health, building, and fire approvals. Requirements differ by city and county, so confirm with the local licensing office and health department before you sign a lease.
Question: Do I need to form a company, or can I start as a sole proprietor?
Answer: Many owners start as a sole proprietor, but you still must meet licensing and tax rules. If you want liability structure or plan to bring in partners, ask a qualified professional which structure fits your plan.
Question: When do I need an Employer Identification Number?
Answer: You may need one if you will hire employees, open certain bank accounts, or file certain federal tax forms. The official application is free through the Internal Revenue Service.
Question: Do I have to collect sales tax on prepared food?
Answer: Many states tax prepared food, but the rules and rates vary by state and sometimes by local area. Confirm registration steps and filing rules with your state tax agency.
Question: What does the health department usually require before I can open?
Answer: Many locations require a food establishment permit and an inspection before opening. Some areas also require plan review before construction or equipment installation.
Question: Will I need a commercial hood and a fire suppression system?
Answer: If you cook in a way that produces grease-laden vapors, local code officials may require commercial ventilation and fire protection features. Confirm early with the building department and fire prevention office, because this can drive major build-out costs.
Question: What accessibility rules apply to a burger restaurant open to the public?
Answer: Businesses open to the public must meet Americans with Disabilities Act requirements, especially when building new space or altering an existing one. Ask your local building office what plan review items apply for entrances, seating, and restrooms.
Question: What insurance should I have before opening day?
Answer: General liability coverage is a common baseline, and your landlord may require proof of coverage before you can open. If you own equipment or build-out items, property coverage may also be needed.
Question: When should I open a business bank account?
Answer: Open it once you have the documents your bank requires, which often include formation papers or a business name filing and a tax identifier. Keeping business and personal transactions separate makes tracking and tax filing simpler.
Question: What equipment is essential to open a small burger restaurant?
Answer: Most setups need a main cook surface, refrigeration, handwashing sinks, dishwashing setup, and food thermometers. Your exact list depends on your layout, service style, and what local reviewers require.
Question: How do I choose suppliers for beef, buns, produce, and packaging?
Answer: Compare product specs, delivery days, minimum orders, and credit terms before you commit. Ask how they handle shortages, substitutions, and recall notices.
Question: How do I set pricing as a new owner?
Answer: Build pricing from your ingredient cost, labor needs, occupancy costs, and required profit, not from what competitors charge. Test pricing with realistic order sizes, including combos and add-ons.
Question: Do I have to post calorie counts on my menus and menu boards?
Answer: Federal menu labeling rules apply to covered chain establishments with 20 or more locations under the same name and substantially the same items. If you are not covered, your state or city may still have separate rules, so confirm locally.
Question: Do restaurants have to register as food facilities with the Food and Drug Administration?
Answer: Restaurants are generally exempt from the federal food facility registration requirement. If you operate a separate facility that makes or holds food for distribution beyond direct retail service, confirm whether registration applies.
Question: What is the safe internal temperature for burger patties?
Answer: Federal food safety guidance states ground beef should reach 160°F as measured with a food thermometer. Train staff to use thermometers instead of relying on color.
Question: What employee paperwork must I handle when I start hiring?
Answer: Employers must complete and retain Form I-9 for each new hire and follow the official instructions. Many employers also must report new hires to the state within the required time window.
Question: Do I have to post any required workplace notices?
Answer: All covered employers are required to display the Occupational Safety and Health Administration “Job Safety and Health: It’s the Law” poster. Verify federal and state posting rules for your exact setup.
Question: What are the most useful daily numbers to track once I open?
Answer: Track sales, number of orders, average ticket, labor hours, and food cost for the day. Watch order accuracy and remake counts so quality issues do not hide inside sales totals.
Question: How should I staff shifts without over-hiring?
Answer: Start with a simple station plan for rush periods and schedule based on the busiest hours, not the full day. Adjust weekly using sales-by-hour results from your point of sale system.
Question: What are common workflow problems that hurt speed and accuracy?
Answer: Bottlenecks often come from unclear station roles, weak prep planning, and poor ticket flow from the point of sale to the kitchen. Fix this with written opening and closing checklists and a clear line setup.
Question: How do I keep cash flow steady in the first few months?
Answer: Keep a cash buffer for payroll, rent, and supplier bills while sales patterns stabilize. Review payables and inventory ordering weekly so you do not tie up cash in extra stock.
Related Articles
- Pizza Shop Startup Guide
- Start a Barbecue Business
- Starting a Food Truck Business
- Starting a Bagel Shop
- Start a Delicatessen
- Starting a Concession Stand
- How to Open a Breakfast Restaurant
- How to Start a Meal Prep Business
- Starting a Bubble Tea Shop
- Start an Ice Cream Shop
- How to Start a Bakery
- Start a Butcher Shop
Sources:
- ADA.gov: Open public businesses
- ACF (Administration for Children and Families): New hire reporting
- FDA (Food and Drug Administration): FDA Food Code, Menu labeling requirements
- FoodSafety.gov: Safe minimum temperatures
- IRS (Internal Revenue Service): Get employer ID number
- NFPA (National Fire Protection Association): NFPA 96 standard
- OSHA (Occupational Safety and Health Administration): Required workplace poster
- SBA (U.S. Small Business Administration): Register your business, Licenses and permits, Get business insurance, Open business bank account
- USCIS (U.S. Citizenship and Immigration Services): Completing Form I-9
- USDA FSIS (Food Safety and Inspection Service): Ground beef food safety